The Essential Guide to Docker Container Components

Sharma bal
Table of content
- 1. Deconstructing Docker Containers: Key Components
- 2. Unveiling the Blueprint: Core Dockerfile Components
- 3. Crafting Efficient Dockerfiles: Best Practices
- 4. Docker Container Lifecycle: From Creation to Termination
- Conclusion
Understanding the fundamental building blocks, or docker container components, is crucial for effectively working with Docker. These components work together to create lightweight, portable, and isolated execution environments for your applications. This guide delves into the core functionalities of each component, empowering you to build, manage, and leverage containerized applications with confidence.
1. Deconstructing Docker Containers: Key Components
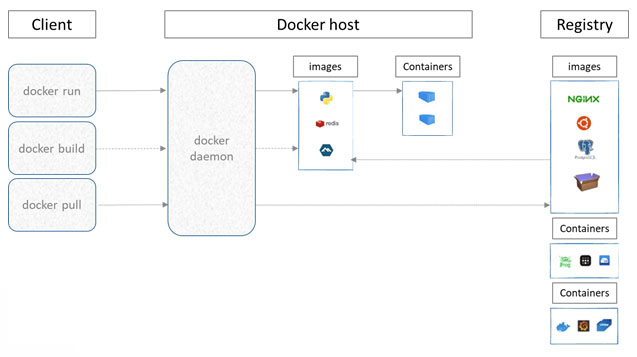
Docker containers are not monolithic entities. They are comprised of several essential components that work in harmony to provide a self-contained environment for your application. Let’s explore these key components:
1.1 Processes: The Workhorses Within Containers
Every running container has its own set of processes. These processes are responsible for carrying out the functionalities of the application packaged within the container. They can include:
- The application process itself (e.g., web server, database)
- Supporting background processes (e.g., logging daemons, monitoring tools)
Isolation of these processes from the host and other containers ensures a clean and predictable execution environment.
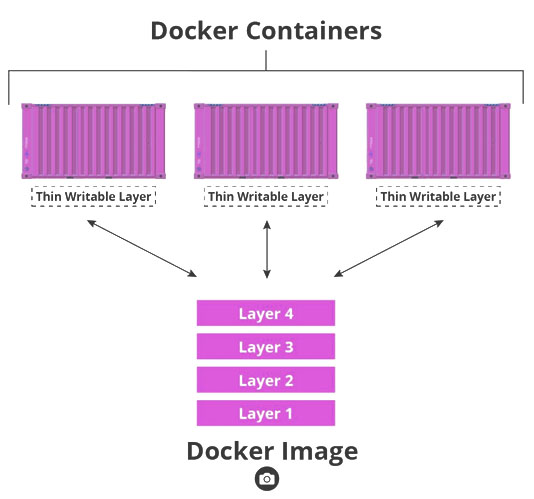
1.2 Filesystems: Tailored Environments for Applications
Each Docker container has its own isolated filesystem. This filesystem is created from a layered image, allowing for efficient storage and updates. The container’s filesystem contains all the necessary files for the application to run, including:
- The application binaries and libraries
- Configuration files
- Runtime dependencies
The layered structure of Docker images enables efficient reuse and reduces the overall size of containers.
1.3 Isolation Mechanisms: Securing Containers and the Host System
One of the key benefits of Docker is its ability to isolate containers from each other and the host system. This isolation is achieved through several mechanisms:
- Namespaces: Namespaces provide a virtualized view of system resources like processes, network interfaces, and user IDs. This prevents containers from interfering with each other or the host system.
- Control Groups (cgroups): Cgroups limit the resources (CPU, memory, I/O) available to a container, ensuring fair resource allocation and preventing runaway processes.
- Security Profiles: Docker allows you to define security profiles that restrict a container’s capabilities, such as file system access or network privileges.
These isolation mechanisms create a secure and predictable environment for running containerized applications.
Table 1.1: Summary of Docker Container Isolation Mechanisms
| Mechanism | Description |
|---|---|
| Namespaces | Virtualize system resources for processes, network interfaces, and user IDs. |
| Control Groups (cgroups) | Limit resource allocation (CPU, memory, I/O) for each container. |
| Security Profiles | Restrict container capabilities like file system access or network privileges. |
By understanding these key components and their functionalities, you’ll gain a solid foundation for working with Docker containers. The next sections will delve deeper into Dockerfile instructions, best practices for crafting efficient Dockerfiles, and the lifecycle of a Docker container.
2. Unveiling the Blueprint: Core Dockerfile Components
Dockerfiles serve as the blueprints for creating Docker images. These text files contain a set of instructions that specify how to build the container environment, layer by layer. Each instruction plays a crucial role in defining the container’s configuration and functionality. Let’s explore the core components of a Dockerfile:
2.1 Base Image: The Foundation with FROM
The FROM instruction is the cornerstone of a Dockerfile. It specifies the base image upon which your container will be built. This base image serves as the foundation and provides the underlying operating system and any pre-installed software your application requires. Popular base images include Ubuntu, Alpine Linux, and various language-specific base images like “python:3.10”.
Here’s an example of using the FROM instruction:
(Dockerfile)
FROM ubuntu:20.04
Use code with caution.
This line instructs Docker to use the “Ubuntu image version 20.04” as the base for your container. Choosing the right base image can significantly impact your container’s size and efficiency.
2.2 Building Environment: Installation Steps with RUN
The “RUN” instruction is used to execute commands within the container during the image building process. These commands typically involve installing application dependencies, copying files, or configuring the environment. You can chain multiple RUN instructions to perform a series of actions.
Here’s an example of using the RUN instruction to install a web server:
(Dockerfile)
RUN apt-get update && apt-get install -y nginx
Use code with caution.
This line updates the package list and installs the nginx web server within the container image.
Important Note: While RUN instructions are essential for setting up the environment, excessive use can lead to larger image sizes. Consider multi-stage builds for more optimized Dockerfiles.
2.3 Default Command: Defining Startup Behavior with CMD
The default command for the container to start is determined by the ‘CMD’ instruction. This command defines the application’s entry point and determines how the container behaves upon launch.
Here’s an example of using the CMD instruction to start a web server:
(Dockerfile)
CMD [“nginx”, “-g”, “daemon off;”]
Use code with caution.
This line defines the nginx command with the -g flag and argument, instructing it to run in the foreground.
There’s also an alternative instruction, ENTRYPOINT, which can be used for more advanced scenarios where you want to provide a default executable but allow overriding it during container execution.
2.4 Exposed Ports: Making Services Accessible with EXPOSE
The EXPOSE instruction doesn’t directly map ports within the container. Instead, it serves as a documentation mechanism, informing users that specific ports within the container are intended to be exposed. When running the container, you’ll use the “-p” flag to map these exposed ports to ports on the host system, making the container’s services accessible.
Here’s an example of using the EXPOSE instruction:
(Dockerfile)
EXPOSE 80
Use code with caution.
This line indicates that port 80 (typically used for web traffic) is exposed within the container.
By effectively combining these core Dockerfile components, you can create customized and efficient Docker images that encapsulate your applications and their dependencies in a self-contained environment. The next section will delve into best practices for crafting well-structured and reusable Dockerfiles.
3. Crafting Efficient Dockerfiles: Best Practices
Building efficient Dockerfiles is essential for creating lightweight, portable, and maintainable container images. Here are some key best practices to follow:
3.1 Layered Dockerfiles: Building Blocks for Reusability
One of the core strengths of Docker is its image layering system. Each RUN instruction in your Dockerfile creates a new layer on top of the previous one. By leveraging this concept, you can optimize your Dockerfiles for efficiency and reusability. Here’s how:
- Favor Multi-Stage Builds: Separate the build environment from the final container image using multi-stage builds. This lets you to install dependencies and perform build tasks in a temporary stage, resulting in a smaller final image size.
- Optimize Base Images: Choose the most minimal base image that fulfills your application’s requirements. Larger base images can lead to bloated container sizes. Consider alternatives like Alpine Linux for a smaller footprint.
3.2 Optimizing Package Management: Using COPY and ADD Strategically
Docker offers two primary instructions for copying files into the container image: COPY and ADD. Understanding their nuances can significantly impact your Dockerfile’s efficiency.
- Use
COPYfor Static Files: When copying static files (e.g., configuration files, application code) that won’t change during the build process, use theCOPYinstruction. It’s faster and more efficient. - Use
ADDfor Untarred Files: If you need to untar archives or process files during the copy operation, use theADDinstruction. It provides more flexibility but can be slightly slower thanCOPY.
By strategically choosing between COPY and ADD, you can optimize the file copying process within your Dockerfile.
3.3 Environment Variables: Configuration at Runtime
Environment variables offer a dynamic way to configure your application within the container. You can define environment variables directly in your Dockerfile using the ENV instruction or set them at runtime when launching the container.
Here’s an example of using the ENV instruction:
(Dockerfile)
ENV APP_NAME my-app
Use code with caution.
This line defines an environment variable named APP_NAME with the value my-app. You can then access this variable within your application code to configure its behavior.
Leveraging environment variables promotes flexibility and easier configuration management for your containerized applications.
3.4 Maintaining Readability: Effective Dockerfile Structure
A well-structured and readable Dockerfile is crucial for maintainability and collaboration. Here are some tips for structuring your Dockerfile effectively:
- Group Related Instructions: Organize your Dockerfile instructions logically. Group similar instructions (e.g., all
RUNcommands for installing dependencies) together for better readability. - Use Comments: Add clear and concise comments throughout your Dockerfile to explain the purpose of each instruction and the overall workflow. This will make your Dockerfile easier to understand for yourself and others.
- Favor Smaller Files: Break down complex Dockerfiles into smaller, more manageable files. This can improve readability and maintainability, especially for larger projects.
By following these best practices, you can craft efficient and well-structured Dockerfiles that streamline your container development process.
4. Docker Container Lifecycle: From Creation to Termination
Understanding the lifecycle of a Docker container is essential for effectively managing and deploying containerized applications. Let’s delve into the different stages a container goes through, from its initial creation to its eventual termination.
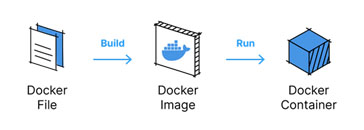
a. Image Creation: Building the Blueprint
The journey begins with the Docker image, the blueprint that defines the container’s environment. You create a Dockerfile, a text file containing instructions that specify the operating system, dependencies, and configuration for your application. Docker uses this Dockerfile to build a layered image, where each layer represents a specific step in the build process.
b. Container Creation: Instantiating the Image
To create a container from a Docker image, simply use the ‘docker run’ command. This command instructs Docker to take the image and create a running instance of it. The container inherits the filesystem, configuration, and dependencies defined within the image.
Here’s what happens during container creation:
- Docker unpacks the image layers and creates a writable container filesystem.
- The container’s isolated environment is set up, including namespaces and cgroups.
- The application specified in the Dockerfile (or default command) is launched within the container.
c. Container Execution: Running the Application
The newly created container is now in a running state. The application defined in the image starts executing, and any processes required for its functionality are initiated.
During this stage, you can interact with the container in several ways:
- Attaching to the container: You can use the “
docker attach”command to view the container’s logs and standard output in real-time. - Executing commands: You can use the “
docker exec”command to run additional commands within the container’s environment.
d. Termination: Stopping and Removing Containers
When you’re finished using a container, you can terminate it using the “docker stop” command. This gracefully stops the running processes within the container and releases its resources. However, the container object itself remains on your system.
To completely remove the container and its associated filesystem, you can use the “docker rm” command. This removes the container object from the Docker engine.
Here’s a table summarizing the different states of a Docker container:
| State | Description |
|---|---|
| Image | The blueprint that defines the container’s environment. |
| Created | The container object exists, but the application is not running. |
| Running | The application within the container is executing. |
| Stopped | The application has stopped, but the container object remains. |
| Removed | The container object and its associated filesystem are deleted. |
By understanding the lifecycle of a Docker container, you can effectively manage your containerized applications throughout their deployment process.
5. Exploring Additional Components: Advanced Topics
While the core components covered so far provide a solid foundation for working with Docker containers, there are several advanced features that offer even greater flexibility and control:
5.1 Volumes: Persistent Data Storage for Containers
By default, container data is stored within the container’s writable filesystem layer. However, this data is ephemeral and disappears when the container is stopped or removed. Volumes offer a mechanism for persisting data outside the container’s lifecycle.
Here’s how volumes work:
- You define a volume during container creation using the “
-v”flag with “docker run”. - This mounts a directory or block device on the host system as a volume within the container.
- Any data written to the volume persists on the host system, even if the container is stopped or removed.
Volumes are crucial for applications that require persistent data storage, such as databases or web applications with user-generated content.
5.2 Networks: Enabling Communication Between Containers
By default, Docker containers are isolated from each other. However, you can create custom networks to allow containers to communicate and interact with each other. These networks can be:
- Bridge networks: The most common type, providing basic connectivity between containers and the host system.
- Overlay networks: Enable communication between containers across different Docker hosts in a swarm cluster.
Networks are essential for building complex, distributed applications where containerized services need to interact with each other.
5.3 Secrets: Securely Managing Sensitive Information
Storing sensitive information like passwords or API keys directly in your Dockerfile or environment variables can be a security risk. Docker secrets offer a secure way to manage such information.
Here’s how secrets work:
- You define a secret using the “
docker secret create”command. - This secret stores the sensitive information securely on the Docker engine.
- You can then reference the secret within your container using environment variables or by mounting it as a file.
Secrets help to improve the security posture of your containerized applications by keeping sensitive information out of plain sight.
Conclusion
By understanding the fundamental components and functionalities covered in this guide, you’ve gained a strong foundation for deploying and managing Docker containers. As you delve deeper into the world of containerization,
Explore the additional features like volumes, networks, and secrets to unlock the full potential of Docker for building and running modern applications. For further exploration and in-depth tutorials, visit the Hostomize or browse the informative articles on our blog page. Hostomize is dedicated to empowering developers with the knowledge and tools to leverage the power of containerization effectively.